グライダーの曳航に関するアレやコレ 2008.07.16
| 先日Martin Weberschockさんのランチセッティングについての講義をテキストにまとめた 物がネットに掲載されました。 英文で書かれた文章を稚拙ながらも一生懸命翻訳し、読んで感じた事などを書き連ねて 見ます。 テキストには、フック位置についての事と、曳航モードのセット方法が書かれていましたが、 まず、他の方とは違うとかも思いますが、私のセッティング方法を書きたいと思います。 SHADOWを例に取れば、とりあえずメーカーや諸先輩のセッティングをまねた所にフック をセットします。 フック位置は重心位置から概ね10ミリ前方に仮設置しました。 エレベーターは送信機のプリセットで+2%としました。 この状態でウインチ曳航して気になったのが「立ち」です。 「立ち」とは曳航ラインに対する 胴体の角度の事です。 角度が浅く、風のはらみが悪く感じました。 そこでフック位置を下げてみます。 すると、今度は立ちは良くなりましたが、上昇時に首を振るようになってしまいました。 風をはらみ、前に進むギリギリの角度だとこうなるようですが、F3Jの競技では15メートル 間隔で同時発航しますので、怖くて使えません。 せっかく沢山風をはらんでいるのに残念ですが首を降らないところまでフックを前進させて 真っ直ぐ上がるようにします。 次にショックコードで上げたところ、脱索するようになってしまいました。 ショックコードの 方が初期の速度が高いせいと聞きました。 ベテランの方はエレベーターダウンで補正して回避しているようですので、プリセットで入れ てあるエレベーターUPを減らしていき、結局±0%で落ち着きました。 結局の所、飛ばしてみないとフックの位置は決められませんでした。 |
| テキストの内容にはこうあります。 フック位置 「フックの位置は重心位置ではなく、機体の空力中心によって決まる」 ここで、普通「空力中心」と言うと主翼単体の空力中心を示します。 揚力の大きい、小さい 等での補正係数はありますが、概ね平均翼弦の前縁から25%と言われます。 ですが、ここで言う機体の空力中心はたぶん揚力バランスの取れた場所を指すのだと 考えました。 原文にはこうあります。 Aerodynamic Centre of the model. この位置は先尾翼機の重心位置を求めるとき等に使う絵を利用して大体の物ですが見つけ る事が出来ます。 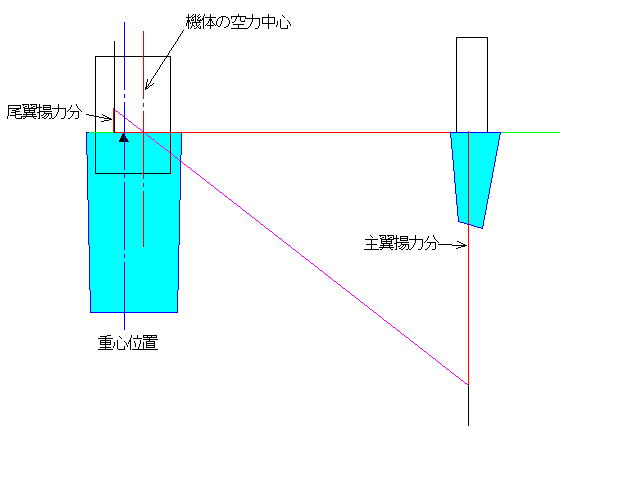 主翼の空力中心の位置とテールモーメント、尾翼の空力中心の位置を決めて線を引き、主翼側 には尾翼面積分の線を、尾翼側には主翼面積の分の線を引き、その頂点同士を結びます。 モーメントアームとして書いた線と交差したところが機体の空力中心となります。 厳密に言えば主翼し尾翼では主翼の方が揚力を多く発生させているのでその分を付加しないと いけませんが...そんな物...判りません。 重心位置はその前後の重さ釣り合った場所ですが、この位置はその前後の揚力の釣り合った 場所といえます。 角凧に例えると、対角線を結んだ点...丁度中心ですね。 例えば、この位置から真下に延ばした延長上にフックを付けたとすると、機体は引きずられるだけ で上昇してくれないでしょう。 凧の糸目を凧のど真ん中に付けたのと同じ状態と考えると判りや すいかと思います。 ですが、空力的に釣り合った場所ですから、この場所が基本となります。 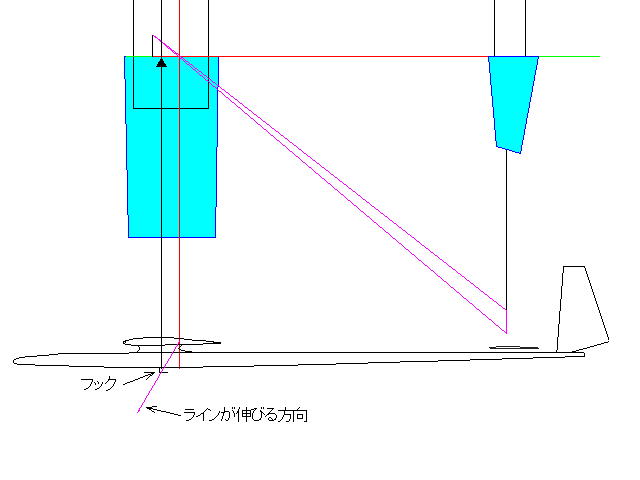 この位置から、理想の曳航角度のラインを引いた場所がフック位置...という発想です。 凧の糸目と空力中心(角凧ならど真ん中)との関係に近いものがあると思います。 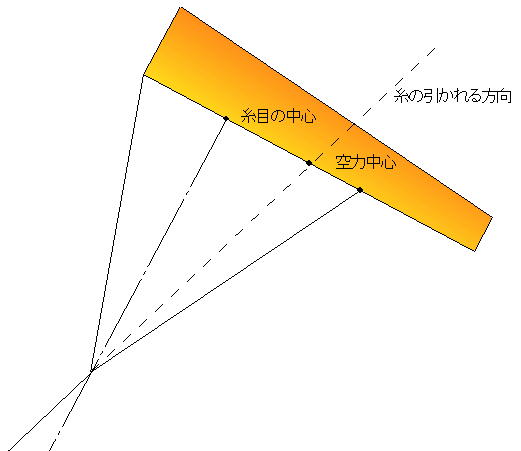 ただ、残念なことに理想の曳航角度と言う物がが判りません。 調子の良い機体の各箇所を測定して、角度を求めるしかないのでしょうか。 一般的には曳航角度が浅過ぎれば走ってしまって上昇に繋がらず、深過ぎれば機速が 乗らずに失速してしまいます。 曳航中に首を振るのは後者の典型的な例だと思います。 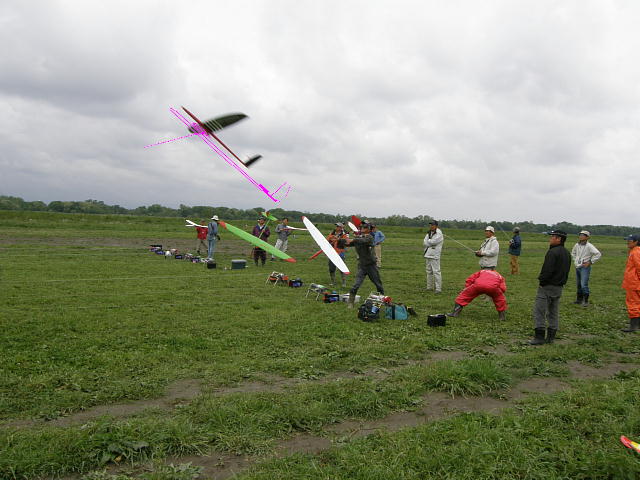 この絵を曳航画像と重ねると、撮影の角度などの補正も必要ではありますが大体重なって いるようです。 |
曳航モードのフラップ設定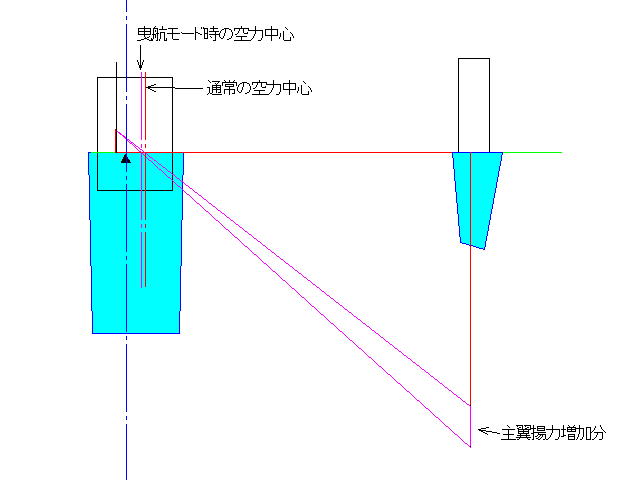 私のセッティングでは 曳航モードでは下げる量にして、10~15ミリと大きくフラップを下げます。 コレを先ほどの 絵に当てはめて、フラップが大きく下がったたために発生した揚力分を追加すると、通常の 時と曳航モードでは空力中心が前に移動します。 フック位置を同じとすれば、立ちが強くなる方向に曳航ラインとの角度が変わって行くと言う 事になりますね。 コレを利用して風の強弱に対してフラップ量を変えて、して立ち加減をコントロールしたりする します。 強風時に主翼のしなり具合と相談して曳航中にフラップを戻したりします。 テキストでは 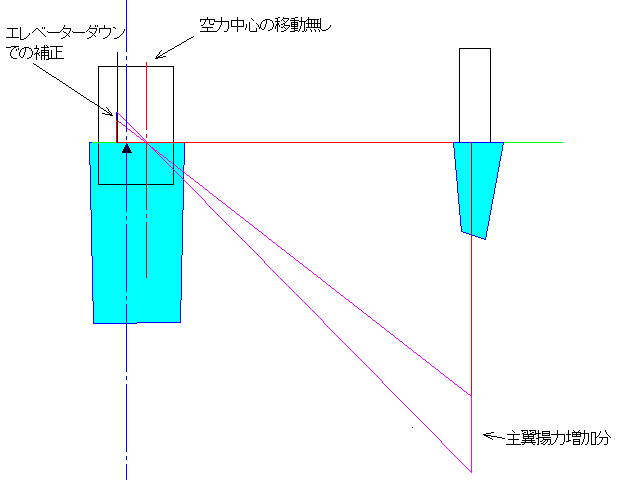 フラップの下げ量に対してエレベーターのダウンで補正を加える様に指示しています。 たぶん、曳航モードのフラップ量コントロールとエレベーターダウンはミキシングににて 連動させていると思います。 コレにより、空力中心は変化することなく、ラインと機体の角度はフラップ量の増減に関 わらず一定にする事が出来ます。 テキストでは、「曳航モードでも普通に飛び回れるように調整しなさい」と言っています。 このテキストは、F3B機に焦点を当てて書かれていますので、主翼強度は無視してい るのでは無いかと思います。 通常のサーマルグライダーやF3J機では主翼強度的 に強風時に辛いと思います。 |
| 以下に原文を貼り付けておきます。 私の中学卒業程度の英語力では色々と見落としもあるでしょうし、曳航などのセッティング に関する考え違いも多々あるかと思います。 是非、皆さんにも読んでいただいて、木村の間違いなどを正していただけるとありがたい と思います。 Analysing Martin Weberschock’s Launch setup By Marcus Stent This is basically my opinion on how Martin Weberschock’s sets up the launch mode of his F3B glider. This was deduced by listening to his lecture in 2000 and applying my learning from the XFoil program (Profili 2). Please feel free to make comment on my observations… Step 1. The towhook for Launch Mode is not dependent on where the C.G. is, but rather where the Aerodynamic Centre of the model is. This is because during launch we add an external force to the model (the winch) which adds probably 50Kg of force to the Model. This force needs to balanced with the Lift force of the Wing, so we get a smooth launch, and this Lift force is generated at the Aerodynamic Centre of the model. The fact that there is a 2Kg model stuck in between these two huge forces is just about irrelevant, and weather the 2Kg mass is 5mm forward or back is going to have even les effect.. The mass of the model is just along for the ride. As you can see the relationship between the line tension (set by the towhook) and the lift of the model (located at the Aerodynamic Centre) are the most important factors. Step 2. What the C.G. does do to the launch is to change the elevator trim position that you fly with. e.g. Lets assume that you are flying in Thermal Mode and you have two identical models with a fixed towhook and flap settings. Then you set up Model 1 in Thermal Mode to have a forward CG of 30% and therefore some up trim (e.g. +2%) is required in the elevator to compensate for the forward CG. Model 2 is set up with a rearward CG of 40% and therefore you have some down trim (e.g. -2%) to compensate for the rearward CG. Both models fly around in Thermal Mode very nicely ‘balanced’. So then what happens during Launch mode is this: Model 1 with its up trim (+2% from the Thermal Mode) during launch (because we use the same elevator settings for our Thermal Mode as we do for the Launch Mode, don’t we!) so the plane pulls hard and wants to tip stall and every one yells "move the towhook forward!!". Model 2 is exactly the opposite and the down trim in the elevator (-2% from Thermal mode) causes the plane to launch very flat and every one shouts "move the towhook back!" What this shows is that two identical planes can end up with two different towhook positions depending on where you set the CG, but what we learnt from the Step 1 is that the Towhook should be set relative to the Aerodynamic Centre of the model and not the CG. So how do we fix this? I am glad you asked... Step 3. What we need is an independent elevator setting that gives us the best balance for Launch irrespective of where your elevator trim is during Thermal mode. We start by looking at the theoretical polar of an airfoil with a high flap deflection (15 degrees) and you will see there is only one optimal Lift position and this corresponds to a specific angle of attack. Too much angle of attack or too little angle of attack and the Airfoil generates lots and lots of drag. So if we can find the optimal angle of attack (elevator pre set) for this flap setting, then we will have the optimal launch. To do this, fly around on the slope with your model in Launch Mode (Launch flap set at say 15 degrees ) and adjust your Launch Mode elevator preset (or angle of attack) until the model flies around without stalling or diving. By doing this you have found the best angle of attack for the airfoil with 15 degrees of Flap. This new elevator setting you have discovered is making the wing work at its optimal angle of attack. What you are doing is matching the practical behaviour of the model to the theoretical polar. eg Because you have found the best angle of attack (elevator preset) by flying around, you must have found the best angle of attack on the theoretical polar. Too much angle of attack and the plane gets draggy and stalls, too low an angle of attack and the plane dives and loses height, just like the theoretical polar. You can then play with different flap settings and find the optimal elevator preset for each one. Then you will have a table of Flap settings with their corresponding optimum elevator presets. Step 4. Now you can take a model that you know has the best setup for that particular flap setting (Flap and elevator setting from Step 3) and apply the 50 Kg of Launch loads to the system. Now, it is a matter of matching the towhook position to the Aerodynamic centre of the model (remember Step 1) by moving the towhook back. As you move the towhook back you will eventually find the spot that lies under the Aerodynamic Centre and the model will be balanced and you will get a smooth launch. What you also know is that at the same time the combination of the Flap and the elevator preset that you discovered in Step 3 is giving the most efficient aerodynamic Lift and this should result in the best launch. In Conclusion: We are using the same principle here as we do when we change into camber mode when we are thermal flying. e.g. You are flying around with a nicely trimmed model and then you 'flick' into Camber mode which gives you 2mm of thermal flap. What happens? The model pitches up, stalls and comes down quicker, until we add a little down elevator pre-set and find the new 'optimum point' between the flaps and the elevator. In a nutshell: "Finding the optimal Launch setup is like finding the optimal thermal setting, the only difference is there is 50Kg of concrete hanging off the bottom of the plane in Launch mode" In both cases you want the best combination of flap and elevator setting to keep you up the longest. All the best with your launch setup. Marcus |